Create User Interfaces from Code
Overview
Sometimes you will find a need to generate a UI object in code - this could be because it cannot be defined in a storyboard (e.g. you don't know how many elements are needed from a server response) or you want to add custom UI elements to a table cell.
This lesson will show you how to create some of the basic UI elements in code, and add them to the application's current view.
To create most UI objects you need to:
- Declare a variable of the specific UI object.
- Initialize the UI object using a CGRect to define it's Frame.
- Add the object to the current view.
- Set Colour, text and other parameters of the object.
TIP
Steps 1 and 2 can be combined in to one line of code, and steps 3 and 4 can be done in either order (i.e. set the object's properties, and then add it to the parent view).
Define a Frame for a UI Object
All UI objects in iOS are visually placed and sized by its Frame. The Frame defines the object's position within its parent view, and the object's size. It does this using an object called a CGRect - that is all a Frame is.
Below you can see a diagram of a Frame:
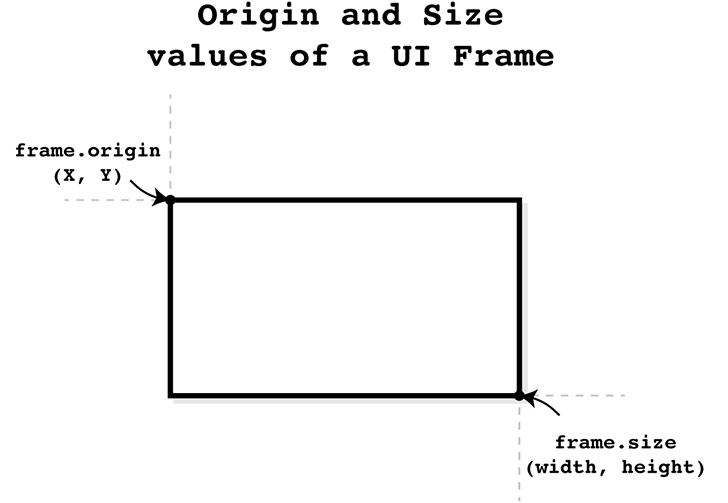
And here you can see the corresponding values for a CGRect:

Let's look at some examples of how to add a user interface to a view by creating a UITextView, UITextField, UIImage, and UIButton in code.
Create a UITextView in code
First, at the top of the ViewController class, declare an @IBOutlet variable of the type of UI object you want.
@IBOutlet var newTextView : UITextView!
Next, you need to define a CGRect that will hold the parameters for the UI object's frame (position and size). The CGRect values are passed to the UI object's init method, which will create the UI object with the desired size, and origin. Then, you add the new UI object to the main view of the application. And lastly you can edit the text, colour and other properties of the new UI object.
// Define the new TextView size and positioning with a rectlet
let textViewFrame = CGRect(x: 20, y: 340, width: 340, height: 200)
// Create TextView object
newTextView = UITextView(frame: textViewFrame)
// Add TextView to the main view
self.view.addSubview(newTextView)

// Setup TextView text, and style
newTextView.text = "This is some text."
newTextView.textColor = UIColor(red: 0.9, green: 0.9, blue: 0.9, alpha: 1.0)
newTextView.backgroundColor = UIColor.darkGray
2
3
4
5
6
7
8
9
10
11
Now when an application that contains this code is run, you should see a TextView 20 point from the left, and 340 from the top of the view. It will have a width of 340, and a height of 200 points, and will have light-grey text on a dark-grey background with some text displayed within it.
Create a UITextField in code
At the top of the ViewController class, declare an @IBOutlet for a TextField.
@IBOutlet var newTextField : UITextField!
Next, define a CGRect to hold the UI object's frame (position and size), and create the TextField with it. Then, add the new UI object to the main view of the application. And lastly you can edit the text, colour and other properties of the new UI object.
// Define the new TextField size and positioning with a rect
let textFieldFrame = CGRect(x: 25, y: 280, width: 330, height: 40)
// Create TextField object
newTextField = UITextField(frame: textFieldFrame)
// Add TextField to the main view
self.view.addSubview(newTextField)

// Setup TextField placeholder text, and style
newTextField.placeholder = "This is placeholder text."

// Setup TextField font
newTextField.font = UIFont.systemFont(ofSize: 14)

// Setup TextField text and background colors
newTextField.backgroundColor = UIColor(red: 0.5, green: 0.8, blue: 0.5, alpha: 1.0)
newTextField.textColor = UIColor.black

// Setup TextField border style
newTextField.layer.cornerRadius = 18
newTextField.layer.borderWidth = 3
newTextField.layer.borderColor = UIColor.lightGray.cgColor

// Setup TextField padding
newTextField.layer.sublayerTransform = CATransform3DMakeTranslation(10, 0, 0)

// Setup TextField's security mode (normal or password)
newTextField.isSecureTextEntry = false
2
3
4
5
6
7
8
9
10
11
12
13
14
15
16
17
18
19
20
21
22
23
24
25
26
27
When the application is run there will be a TextField in the center of the view.
Create a UIImageView in code
At the top of the ViewController class, declare an @IBOutlet for an ImageView.
@IBOutlet var newImageView : UIImageView!
Next, define a CGRect to hold the UI object's frame (position and size), and create the ImageView with it. Then, add the new UI object to the main view of the application. And lastly you need to define what image to display in the imageView.
// Define the new ImageView size and positioning with a rect
let imageFrame = CGRect(x: 65, y: 595, width: 30, height: 22)
// Create the ImageView object (size is automatically calculated from the image)
newImageView = UIImageView(frame: imageFrame)
// Add the ImageView to the main view
self.view.addSubview(newImageView)

// Set the image to display in the ImageView
newImageView.image = UIImage(named: "ACLogo")
2
3
4
5
6
7
8
9
When the application is run there will be a small imageView near the bottom-left of the view.
Another Approach to Creating a UIImageView in code
If you would like the image to be displayed at it's full size you can try another approach. Again, at the top of the ViewController class you will need to declare an @IBOutlet for an ImageView.
@IBOutlet var newImageView : UIImageView!
Next, instantiate the ImageView using the initializer that takes an Image. Now, simply define a CGPoint to hold the UI object's position on the screen and set the origin of the ImageView's frame with the point. Then add the new UI object to the main view of the application.
// Create imageView object (size is automatically calculated from the image)
newImageView = UIImageView(image: UIImage(named: "ACLogo"))

// Define the new imageView positioning with a point
let imagePosition = CGPoint(x: 35, y: 35)
// Set the image's position
newImageView.frame.origin = imagePosition

// Add imageView to the main view
self.view.addSubview(newImageView)
2
3
4
5
6
7
8
9
10
When the application is run there will be an imageView at the top of the view.
Create a UIButton in code
At the top of the viewController class, declare an @IBOutlet for a button.
@IBOutlet var newButton : UIButton!
Then define a CGRect to hold the UI object's frame (position and size), and create the button with it. Next, add the new UI object to the main view of the application. And lastly you can edit the text, colour and other properties of the new UI object.
// Define the new Button size and positioning with a rect
let buttonFrame = CGRect(x: 90, y: 535, width: 200, height: 50)
// Create Button object
newButton = UIButton(frame: buttonFrame)
// Add TextView to the main view
self.view.addSubview(newButton)

// Setup Button text and style
newButton.setTitle("Press Me", for: .normal)
newButton.setTitleColor(UIColor.cyan, for: .highlighted)
newButton.backgroundColor = UIColor.grey
2
3
4
5
6
7
8
9
10
11
Now when the application runs, you should see a button below the textField. There is no action attached to it, but we will see how to do add one in the next lesson.
You can download a working copy of this code here. In this project the code to create each UI object has been written into its own function. Then, each function is called in the viewDidLoad() function.