Assignment 3: Pick-A-Path Interactive Story
Description
In this assignment, you will be building an interactive pick-a-path story. If you are unfamiliar with the concept of a pick-a-path story, this is a story that is not read in linear order (i.e. you do NOT read the book from page 1, 2, 3, ….End.) Instead, after reading each page, the story gives the reader a set of choices they can pick from that lead them to different pages in the book, guiding them through the story in a non-linear order.
(Optional) Story Content
Here is some sample content that you can use for your pick-a-path story if you don’t have time to come up with your own: Optional Story Content.doc
Requirements
This application will be built off of a Single-View Application. This application will have three views(the main view, and two more), and seven page objects.
Layout
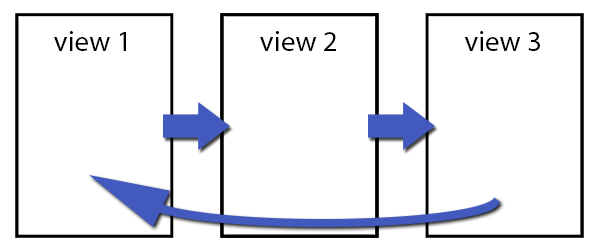
Below you can see a basic diagram of how the user will navigate through the 3 views in your application:
…and the image below shows how the views, and UI should be laid out in your storyboard, and connected with segues. Adding the Navigation
NOTE
A Navigation Controller is added by selecting your first view (before connecting your segues), and going to the menu to Editor->Embed In->Navigation Controller
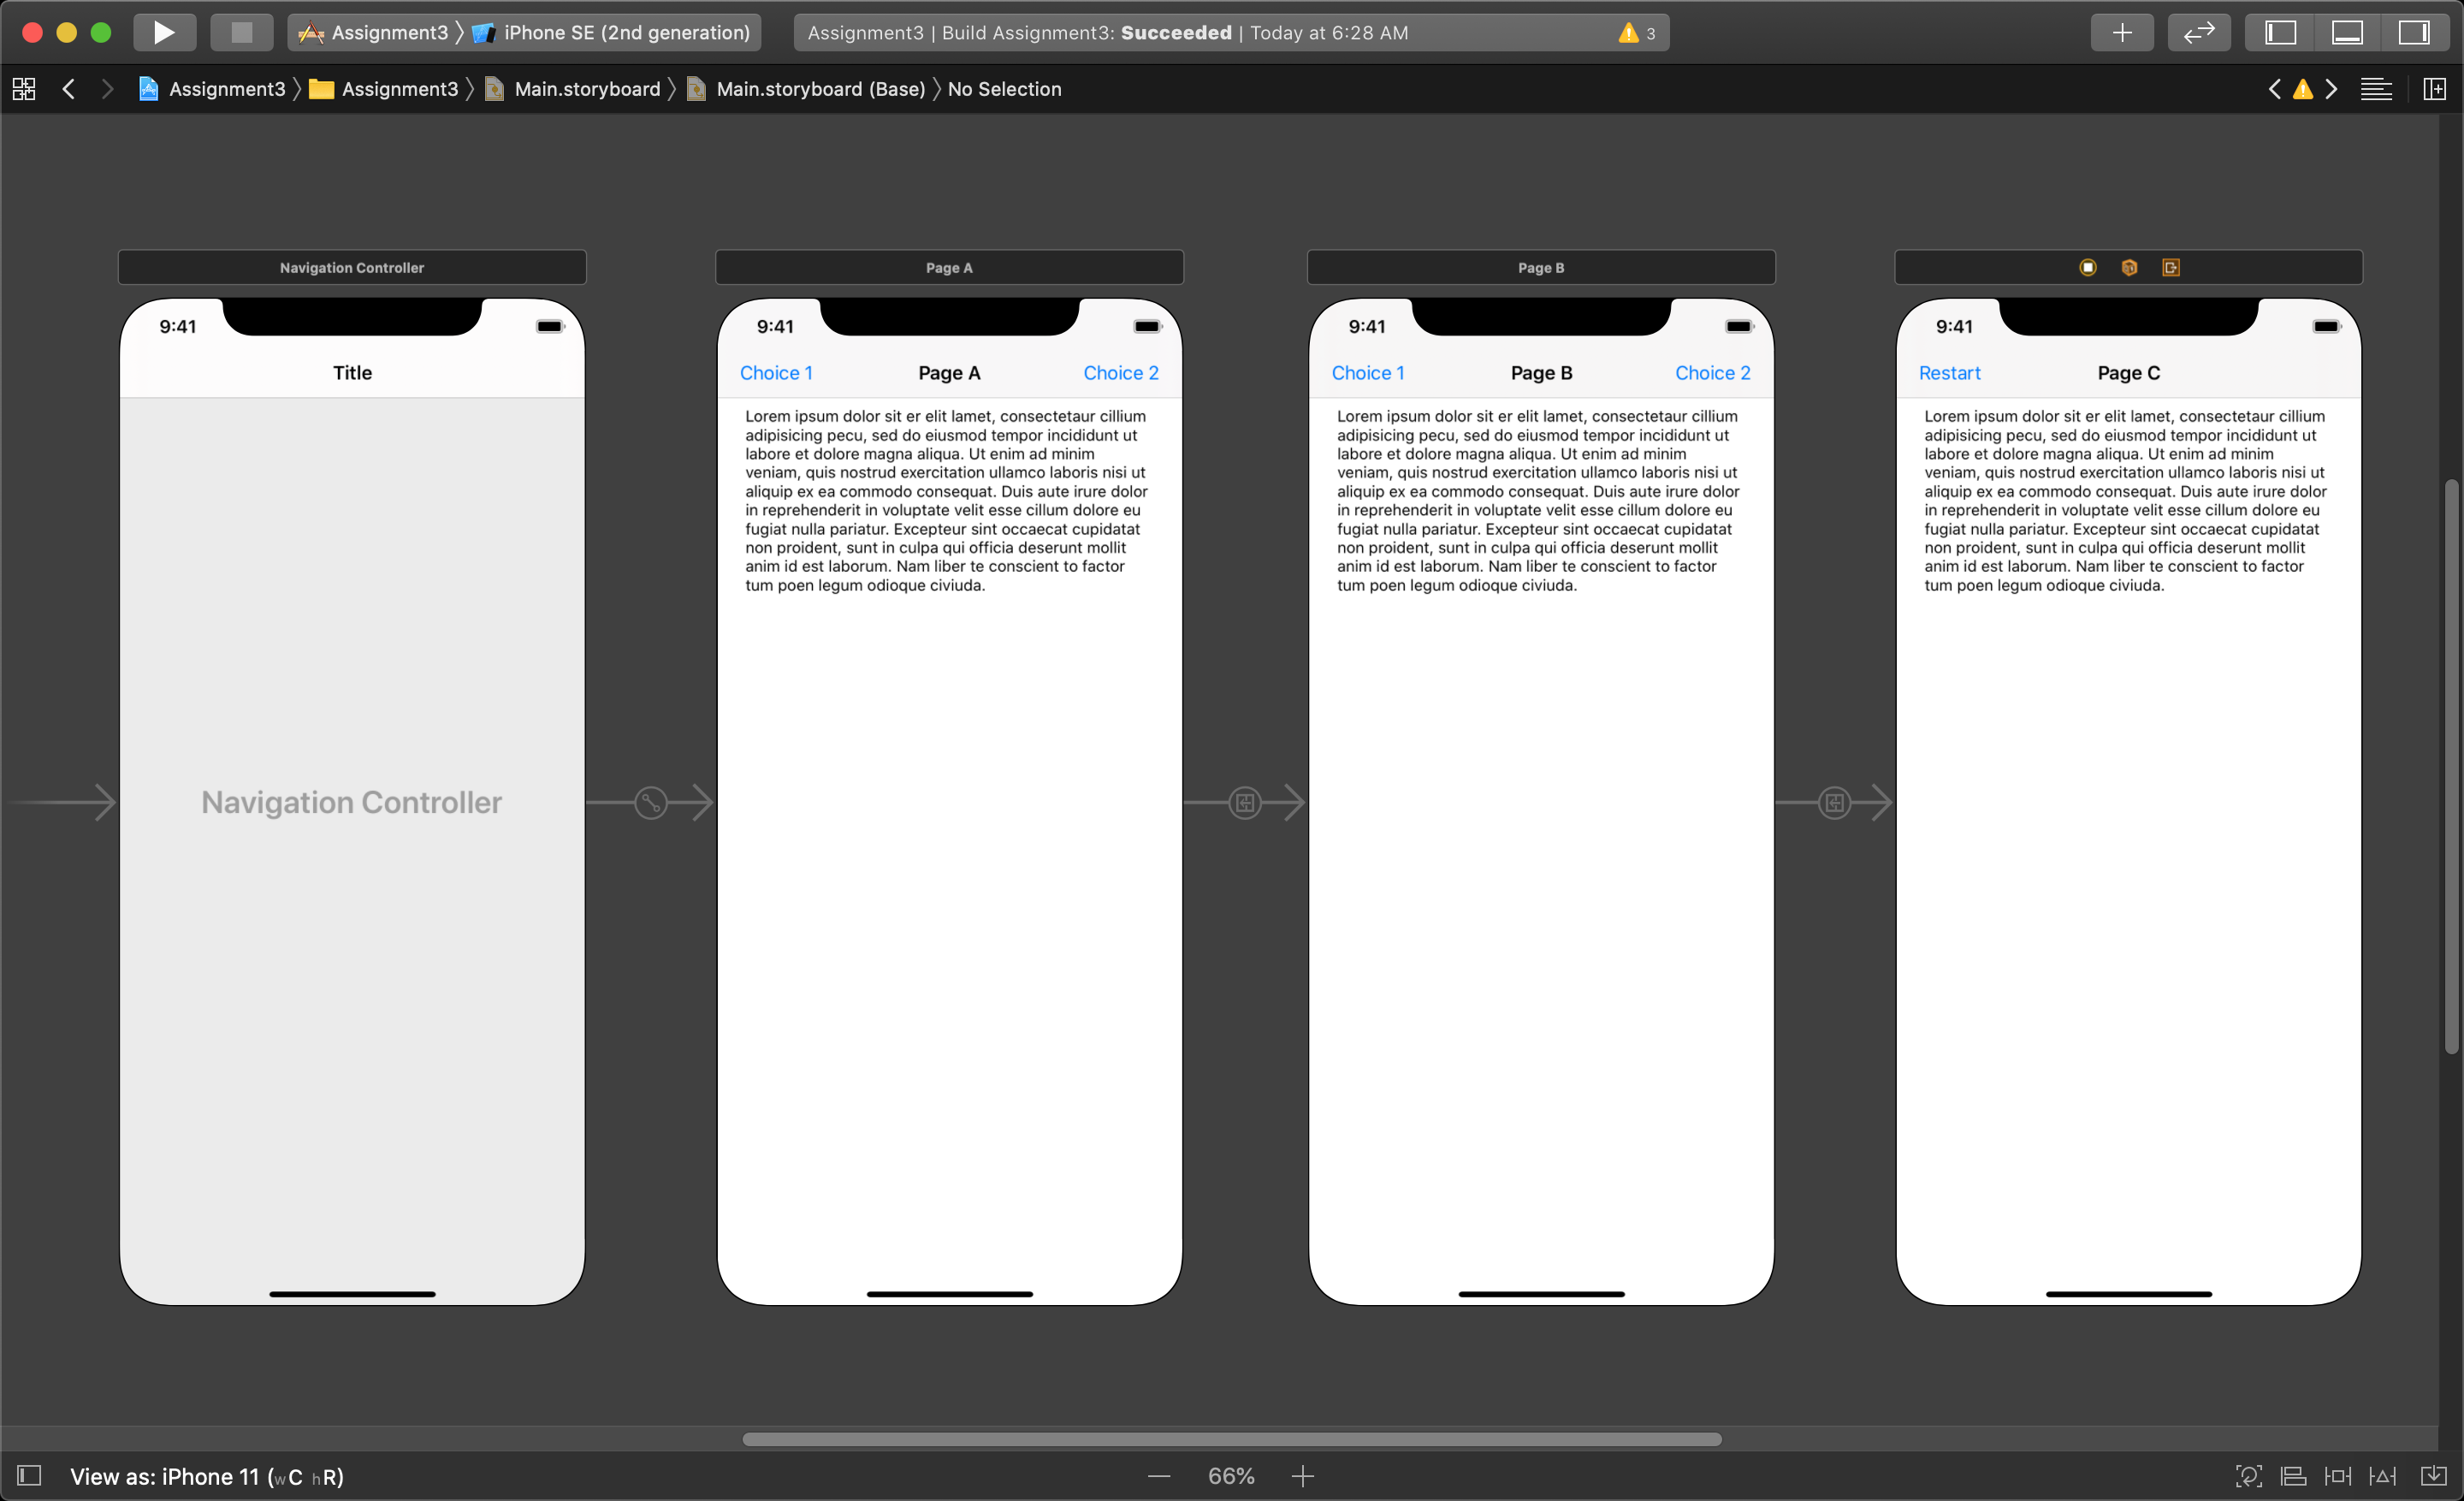
You will connect a segue from view 1 to view 2 and call it’s identifier “showPageB”, and from view2 to view3 wit a segue identifier called “showPageC”. These segues will be triggered in code.
The next steps require you to add some items from your Object Library to the three different views. You need to add a Bar Button Item to the left and right side of the Navigation Bar in the first view.
The second and third view will need a Navigation Item added to them. This adds the ability to customize the nav bar like we did in the first view, letting you add in your own buttons to the nav bar. Now you can add the two buttons to the second view, and a single button to the third.
Outlet and Action connections
You will create two more viewController files for the second, and third view. In your viewController files for all three views you will create an outlet connection for the NavItem so you can set the title property to show the current page number, and an outlet for the textView to display the page text.
In your viewController files for view 1 and view 2 you will also create outlet connection for the two Bar Button Items to display the next page numbers options (ie. on page one, the buttons will display ‘page 2’ and ‘page 3’).
You will also need to create an action for both Bar Button Items in the first two views, and the one button in the third. The actions for the first two views will be called pageButtonA, and pageButtonB used to select what page to show in the next view. The action in the third view should be called restartButton which will be used to start the application back on the first page.
The Page Class
You need to create a new class in your project called “Page”. This object needs to define a page of the story. The following is a list of properties you must add to your Page class:
- an Int called pageNumber
- a String called pageText
- a Page object called pageChoiceA
- a Page object called pageChoiceB
The A-B Tree structure
An A-B Tree is a type of ‘node’ collection used in computer science. This type of collection does not exist in the Swift programming language, so you will be creating it manually. As stated an A-B structure is a type of collection comprised of ‘node’ objects connected together. There is a ‘root’ node object that has properties that contain two other node objects of the same type, and each of these objects in return will have pointers to two more objects. The Page class you create is defined as a ‘node’ object. You will be manually constructing an A-B tree for this assignment with seven Page objects.
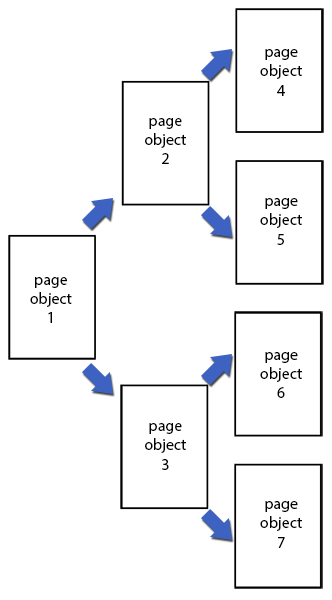
The following diagram shows a visual representation of how the page objects will be connected together:
Start in your viewController.swift file and make 8 Page objects in your viewController class. Called the first 7 ‘page1’ to ‘page7’, initialized like this var page1: Page? = Page(). Call the 8th object ‘currentPage’ and leave it uninitialize for now.
Next, in your viewDidLoad function you will need to set the values of the 7 page objects like page1?.pageNumber = 1 and page1?.pageText = “the text on the first page of the story”. This will be repeated for all seven pages.
Then, you will need to manually make the connections between the ‘nodes’ of the A-B tree by setting:
page1?.pageChoiceA = page2
page1?.pageChoiceB = page3
page2?.pageChoiceA = page4
page2?.pageChoiceB = page5
page3?.pageChoiceA = page6
page3?.pageChoiceB = page7
2
3
4
5
6
This sets page1 as the ‘root’ Page object of the tree, which will hold the content for the first view of the application. Then Page object 2 and 3 will hold the content for the second view of the application, and the objects page4, page5, page6 and page7 hold the content that can be displayed in the third view.
The last step in the first viewController viewDidLoad function is to set the currentPage object like this: currentPage = page1.
Now within the initial viewController you can access the collection of pages using the currentPage object.
Choosing what Page object to pass
Choosing what Page object to pass will happen in the two button actions in the first and second viewController. Both of these actions will simply call performSegue(withIdentifier , sender)
In the first viewController the segue identifier will be “showPageB”. Then in the first button action you will pass a string “buttonA” as the identifier, and you will pass “buttonB” as preformSegue identifier in the second button’s action.
In the second viewController’s button actions you will pass the segue identifier as “showPageC”. And in the first button action of the second view you will again pass the string “buttonA” as the identifier, and in the second button’s action you will pass “buttonB” as identifier.
Passing Pages to the Next View
In this application the user selects one of two options in the story. When this happens your application will need to pass the selected Page object form the current view to the next. To do this you will need to create an optional Page variable in your second, and third viewController called ‘currentPage’ to hold the selected Page object passed from the previous view.
Then, in the first view’s prepare(for segue: UIStoryboardSegue, sender: Any?) function, you will start by setting a variable equal to the next viewController object. Then you need an if-statement to check the sender variable passed to this function from the button action.
You will need to check: if sender as! String == “buttonA” {} and: if sender as! String == “buttonB” {}. If the sender is “buttonA” the you will pass the currentPage.pageChoiceA to the next view, and if the sender is “buttonB” the you will pass the currentPage.pageChoiceB.
To do this you will set the destination view controller’s currentPage object like this: destinationController.currentPage = self.currentPage.pageChoiceA. This sets the second view’s currentPage object to page2. If the second button was clicked then you set destinationController.currentPage = currentPage.pageChoiceB which will set the second view’s currentPage object to page3.
The same steps are repeated in the second view’s prepare(for segue: UIStoryboardSegue, sender: Any?) function to set the third view controller’s currentPage object.
Updating the UI
You will use the override func viewWillAppear(_ animated: Bool) {} of each viewController to set the outlets for that view. You will set the Nav Item’s .title to ‘page’ plus the current page number, and the BarButtonItem’s .title to ‘page’ plus the next page number options (ie. the first view will have a NavBar title set to “page 1” and the buttons will show “page 2” and “page 3”).
Each view will also have the textView’s .text value set to the currentPage’s pageText. The third view’s button action will call the following function to return to the first view: navigationController?.popToRootViewController(animated: true). This simply unwinds all the segues back to the first.
Customize your application
For this step you will have to do three things, first assure your application runs without errors. Second you must comment your code with sufficient description of what your code is doing. The third task is to add constraints to all UI elements.
The last part of the marks come from making unique content for this application. This includes writing your own story, add images, add an additional view and more pages to the A-B tree to make the story longer… etc. The amount of content you add will give you a better mark.
Marks Rubric
Create the views, and viewController files (4pt)
- Create a Single View application project (1pt)
- Add 2 more views (1pt)
- Add 2 new ViewController files and assign them to the new views (2pt)
Make a class called “Page” to hold all the info about a single page in the story (6pt)
- make file with correct name (1pt)
- make a class with the four properties (5pt)
In the first viewController, make an A/B tree structure using Page objects that hold your story (10pt)
- set page numbers and text for 7 Page objects (7pt)
- set links between Pages objects to connect (3pt)
Add navigation controller to first view, and connect the views with segue (5pt)
- adding Nav Controller on to first view (1pt)
- connect the three views with 2 ‘Show’ type segues, and give the segues identifier names (4pt)
Layout the GUI (18pt)
- add a TextView to each view (3pt)
- add a Nav Item to the top of the 2nd and 3rd view (2pt)
- add 2 barButtonItems to the navigationController in the 1st and 2nd view, and 1 to the upper left of the navigationControllers in the 3rd view (5pt)
- add outlets and actions to the 2 barButtonItems, and an outlet for the textView in the 1st viewController (3pt)
- add outlets and actions to the 2 barButtonItems, and an outlet for the textView in the 2nd viewController (3pt)
- add an action to the barButtonItem, and an outlet to the textView in the 3rd viewController (2pt)
Update each view’s GUI in the viewWillAppear function for that view (10pt)
- display the current pageNumber value in the navItem’s title for each view (3pt)
- display the pageText in the textView for each view (3pt)
- display the pageNumber for the pageChoiceA and pageChoiceB in the barButtonItem’s title text (4pt)
Pass the Appropriate Page Object to the Next View (12pt)
- call the appropriate segue, and pass a ‘sender’ value indicating which button was pressed within the performSegue function in each button action (8pt)
- check the 'sender' value you pass to check which button was pressed, and pass the correct Page object to the next view within the
prepare(for Segue, sender)function in the 1st and 2nd view (4pt)
Restart Button (1pt)
- The button action within the 3rd view must call the popToRootViewController function to return to the first view (1pt)
Quality Control (34pt)
- application runs without errors (3pt)
- code is well commented with clear details (15pt)
- add constraints to all UI elements (6pt)
- custom content added to project (10pt)
Total: 100pt
Submission
Submit a .zip file of your assignment through Brightspace.
Use the following naming convention for submissions:
username_assignment-title.zip for example - lenc0001_assignment-3.zip
Due by: Nov. 20, 11:59pm