Final Project - Passport Application
Objective
For your final project, you will be making a “passport” application in iOS using Swift. The purpose of this application is to allow a user to geo-tag locations that they are currently visiting. The user will define the location’s title, their arrival and departure dates, and a description of their trip. This application will store all of the location’s information (including the geo-tag) on a server, which you will access using the Final_API found here https://lenczes.edumedia.ca/mad9137/final_api/.
NOTE
All of your URLRequests must add a modified header field that contains a value of your user username from your school email (eg. lenc0001) for the key "my-authentication". The value string must not have the @algonquinlive.com, and will be plain text (no conversion done to the value string).
Overview
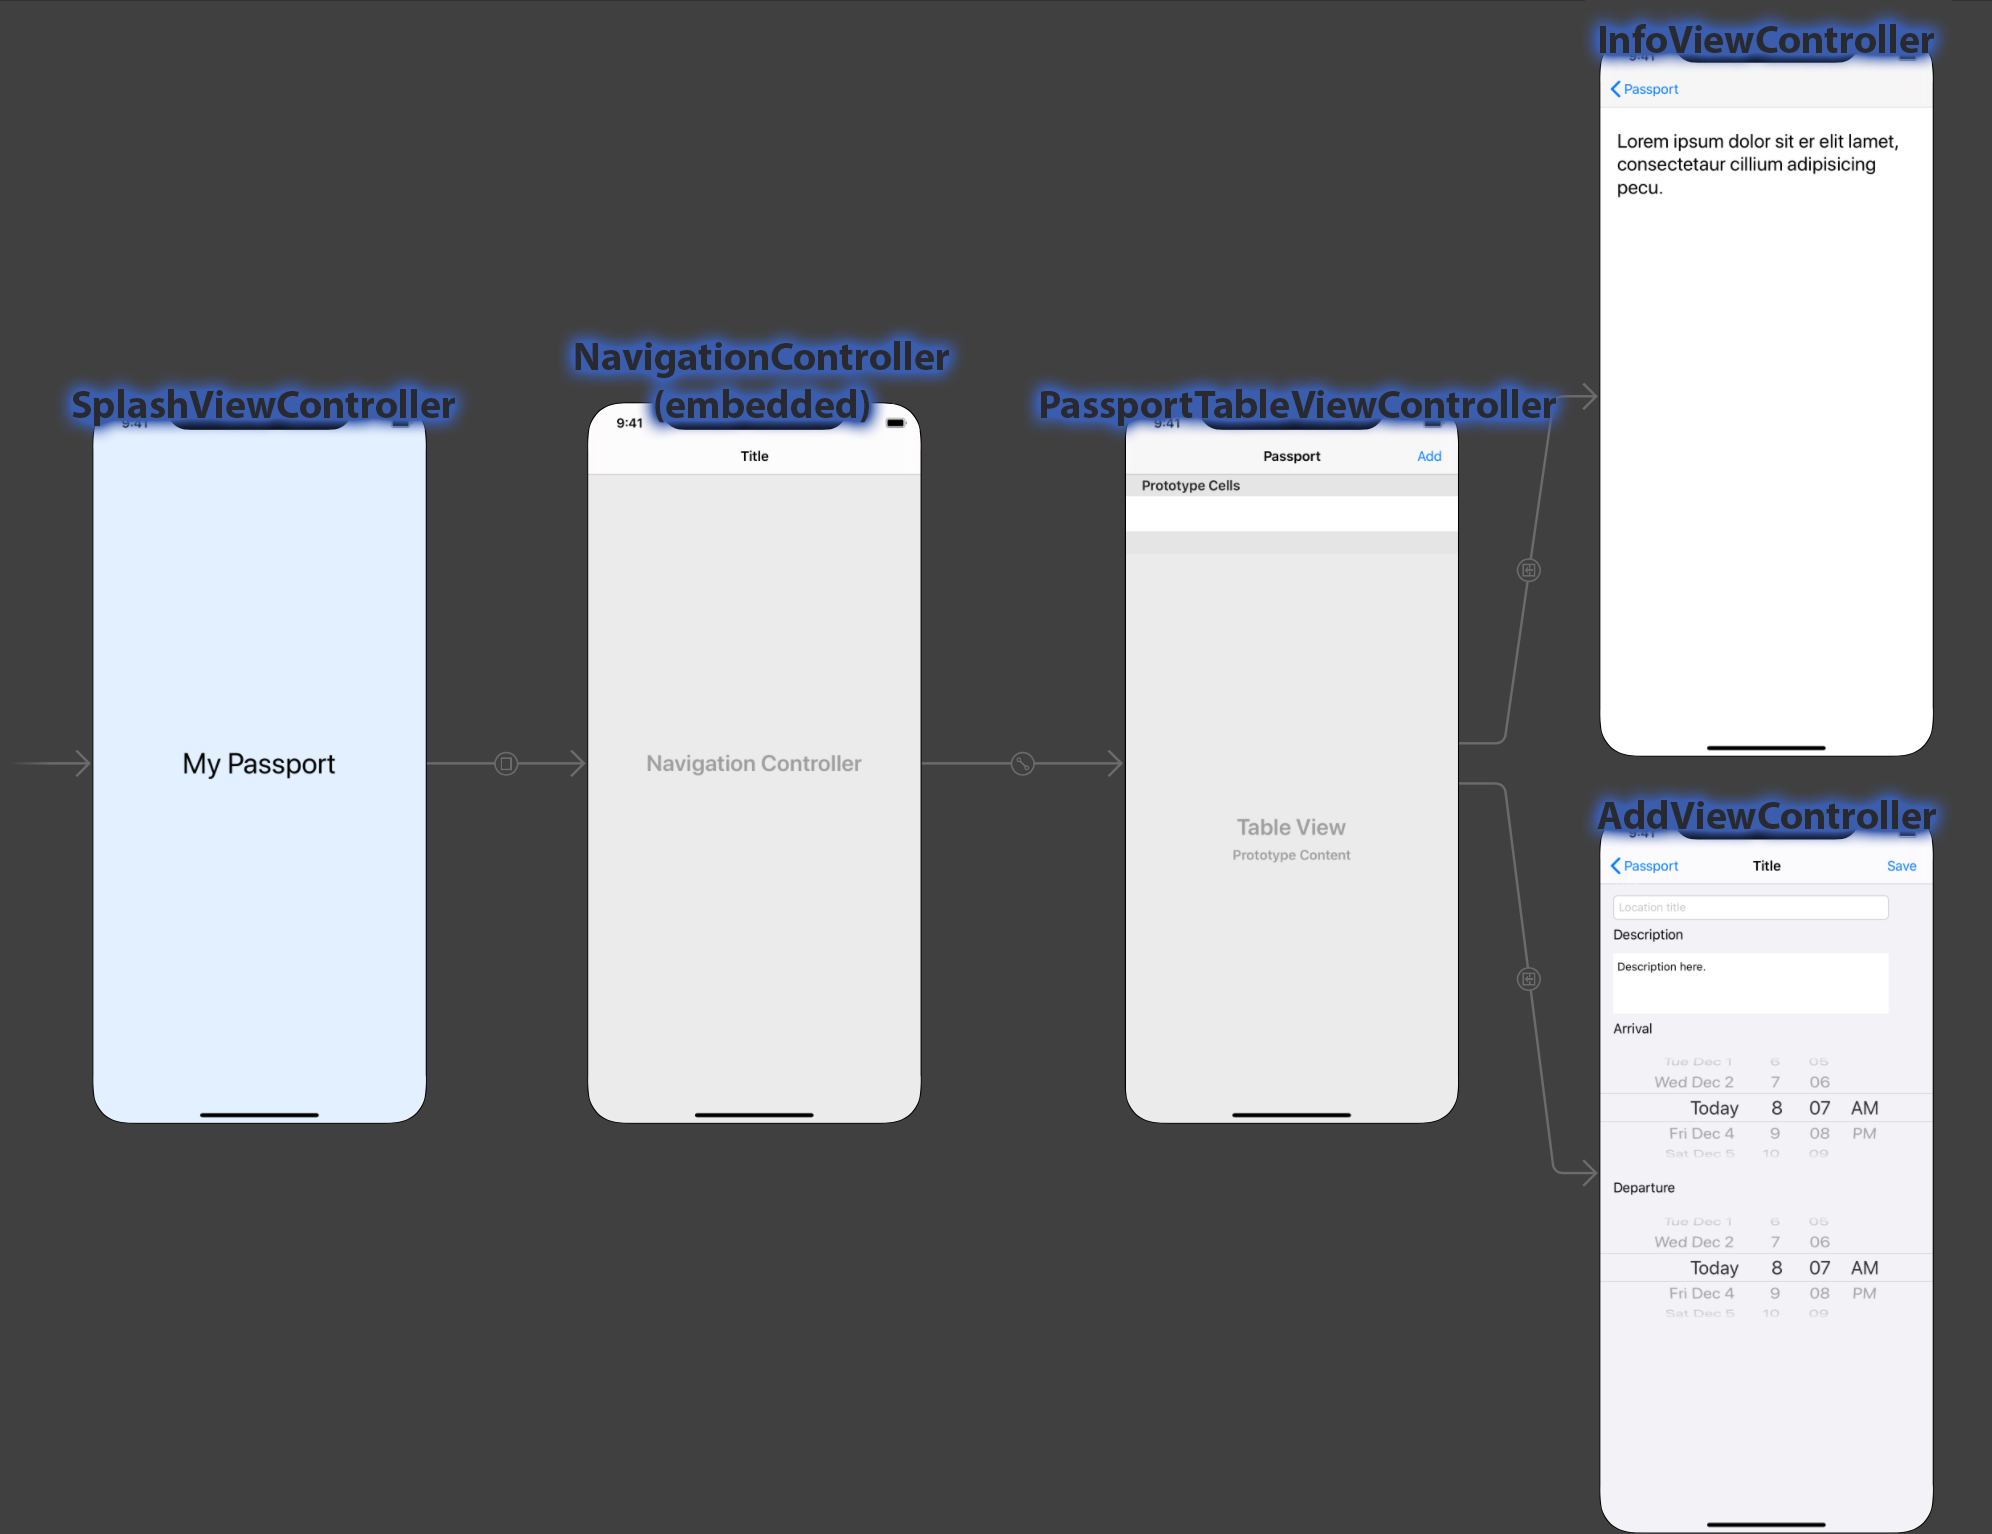
When the user launches this application, they will see the SplashViewController that will display the name of the application for a small amount of time, and then transition to the main view of the application: a TableView. The PassportTableViewController will have a NavigationController embedded in it with a title that shows "Passport", and will have a button in it labeled "Add".
Each cell of the TableView will display one of the names of a location retrieved from the server. Tapping on a cell will transition the user to the InfoViewController that will query the server to retrieve the full details of the selected location, and display that information in a textView.
Clicking the Add button within the TableView will transition the application to the AddViewController. This view will display a textField, textView and two datePicker objects.
This view will also have a button added to the right side of the NavigationController labeled "Save". This button will send the information the user has input, as well as the geo-location of the device to the server before unwinding the segue back to the TableView only if a title has been entered.
When the application first displays, and when it returns to the PassportTableViewController, it will automatically connect to the server to retrieve the full list of locations, and display them.
An example of the application's layout that will incorporate four views and a navigation controller can be seen below.
Application Details
The SplashViewController
When the application launches, it will initially display a splash screen (a view called SplashViewController) announcing the title of the application. This viewController will start a timer that counts to 3 seconds, and then will transition to a tableView (called PassportTableViewController) through the navigationController.
The PassportTableViewController
As mentioned, the navigationController will be embedded in the PassportTableViewController. There will be a navigationItem at the top of the tableView, and you will add a barButtonItem to the right side of the navigationItem and label it “Add”.
The tableView’s viewWillAppear(_ animated:Bool) method will use a URLRequest to load the JSON information for the “passport” locations stored in the RESTful API server https://lenczes.edumedia.ca/mad9137/final_api/passport/read/. This URLRequest returns a JSON string containing all of the title and id values for each location added to your application. You will need to store the JSON information in an appropriate object. Each cell in your tableView will display the title of a location stored in your object.
NOTE
You will need to analyze the server JSON data to determine the correct object type.
The PassportTableViewController will be connected to two more viewControllers via segues: the first segue will be triggered when the user clicks the “Add” button; the second segue will be triggered when the user clicks on a tableViewCell (connected from the prototype cell to the view).
When the user clicks on a cell in the PassportTableViewController, it will segue to the InfoViewController, passing the JSON dictionary object for the specific location id (corresponding to the location title displayed in the cell) within the prepare(for segue, sender) method.
When the user selects the “Add” button from the PassportTableView, it will segue to the AddViewController.
You will have to override the function tableView(_ tableView: UITableView, commit editingStyle: UITableViewCellEditingStyle, forRowAt indexPath: IndexPath) to allow the user to delete a location out of the table. Within this method, you will need to make a separate URLRequest to the following URI https://lenczes.edumedia.ca/mad9137/final_api/passport/delete/?id=, concatenating the location’s id to the end of the delete query.
NOTE
The id value that you will concatenate to the end of the URL comes from the id value of your JSON data, and not from the indexPath of your tableViewCell.
The AddViewController
This viewController will need a textField for the title, a textView for the description, and two datePickers for arrival and departure dates. Clicking on the background of this view will hide the keyboard. There will be a navigationItem added to the top of this view, with a barButtonItem called “Save” on the right-hand side.
This button will be connected to an action. This action will only run if there is text entered in to the textField. When this action runs, you will create a dictionary to hold values for the following keys: title, description, latitude, longitude, arrival, and departure. Your requests will fail if these are not spelled correctly (and are case sensitive).
You will use CoreLocation to get your current location’s latitude and longitude. After converting your dictionary into a string of JSON data, you will then make a URLRequest to the following URI https://lenczes.edumedia.ca/mad9137/final_api/passport/create/?data=, adding your JSON string after the equals sign.
NOTE
You need to add the data from the textField, textView, datePickers and the latitude and longitude into a Swift dictionary, convert it to a Data object and then convert that to a JSON string.
If your URLRequest successfully adds a new location to the database, your callback method should tell the NavigationController to popToRootViewController.
NOTE
You must convert the date objets into a date-string with the exact format like this "2020-12-24 11:11".
The InfoViewController
This viewController needs a dictionary object to hold the selected object’s title and id. It will then run a URLRequest to read all of the location’s information, using the location’s id in your query. The URI for getting a single location's information is https://lenczes.edumedia.ca/mad9137/final_api/passport/read/?id= where you add the id number at the end of the URI. Once loaded, a textView will display the following information for the selected location: title, description, latitude, longitude, arrival, and departure.
NOTE
The exact spelling of the keys returned from this server API call are title, id, description, latitude, longitude, arrival, and departure. You will need to to use exact spelling to access these values from your dictionary after converting the JSON data received from the server.
Marks Rubric
Layout (21pt)
- create a tableViewController, a tableViewController class file, and assign the class to the tableView in the storyboard (3pt)
- embed a NavigationController in the tableView (1pt)
- give your prototype cell a reuse identifier (1pt)
- add a barButtonItem to the right-hand side of the navigationItem at the top of the TableViewController (1pt)
- add a total of three regular viewControllers and three viewController classes (for the SplashViewController, the InfoViewController, and the AddViewController), and assign the viewController classes to the views in the storyboard (9pt)
- after connecting your segues (see below), add a barButtonItem to the top-right of the navigationItem in your AddViewController, and add a textField, a textView, and two datePickers (5pt)
- add a textView to the InfoViewController (1pt)
Actions, Outlets and Segues (13pt)
- create a segue from the SplashViewController to the NavigationController and give it an appropriate identifier (2pt)
- create a segue from the prototype cell in the PassportTableViewController to the InfoViewController and give the segue an appropriate identifier (2pt)
- create a segue from the tableViewController to the AddViewController and give the segue an appropriate identifier (2pt)
- connect your "Add" barButtonItem to an action in your PassportTableViewController class (1pt)
- connect your textView to an outlet in your InfoViewController class (1pt)
- connect your textField textView and both datePicker objects to outlets in your AddViewController (4pt)
- connect your "Save" barButtonItem to an action in your AddViewController (1pt)
SplashViewController class (3pt)
- when this viewController loads, it will wait 3 seconds and then call the
performSegue(withIdentifier, sender)function to segue to the PassportTableViewController (3pt)
PassportTableView class (60pt)
- create an appropriate JSON object to hold the JSON data returned from https://lenczes.edumedia.ca/mad9137/final_api/passport/read/ (3pt)
- in the viewWillAppear(_ animated:Bool) function, make a URLRequest to https://lenczes.edumedia.ca/mad9137/final_api/passport/read/ calling a requestTask upon completion (5pt)
- within your URLRequest, you must add a value to the URL’s header for the key “my-authentication”, and pass in the first 8 characters of your school’s email address (e.g. lenc0001) as the value (3pt)
- write a requestTask to process the server data and any errors that are received by the server, and send it to your callback function (5pt)
- write a callback function that will process any errors if they exist and, if they don’t, process the response string from the server and serialize the JSON response in to your JSON object, then tell the tableView to reload the data (7pt)
- override the tableView functions needed to populate the table with tableView cells, displaying the title stored in the JSON object (10pt)
- override the tableView function to allow the user to delete a location out of the table, and call a function that will make a URLRequest (3pt)
- write a function that takes an integer for an id parameter and calls the URL https://lenczes.edumedia.ca/mad9137/final_api/passport/delete/?id= , passing the location’s id to the end of the delete query to delete (6pt)
- within your delete URLRequest, you must add a value to the URL’s header for the key “my-authentication”, and pass in the first 8 characters of your school’s email address (e.g. lenc0001) as the value (3pt)
- write a deleteRequestTask to process the server data and any errors that are received by the server, and send it to a deleteCallback function (5pt)
- write a deleteCallback function that will process any errors if they exist and, if they don’t, tell the tableView to reload its data (4pt)
- when the user clicks a cell in the table, the prepare( for Segue, sender) must pass the correct dictionary when segueing to the InfoViewController (4pt)
- the “Add” barButtonItem action must call the
performSegue(withIdentifier, sender)function to segue to the AddViewController (2pt)
InfoViewController class (25pt)
- create a dictionary that will hold the location’s JSON object passed from the PassportTableViewController (2pt)
- in the viewDidLoad() function, call the URL https://lenczes.edumedia.ca/mad9137/final_api/passport/read/?id=, passing the location’s id to the end of the query (5pt)
- within your URLRequest, you must add a value to the URL’s header for the key “my-authentication”, and pass in the first 8 characters of your school’s email address (e.g. lenc0001) as the value (3pt)
- write a requestTask to process the server data and any errors that are received by the server, and send it to your callback function (5pt)
- write a callback function that will process any errors if they exist and, if they don’t, process the response string from the server and serialize the JSON response in to your JSON object, then output the title, id, description, latitude, longitude, arrival, and departure to the textView (10pt)
AddViewController class (29pt)
- import CoreLocation framework, and create a CLLocationManager object (2pt)
- in the touchesBegan function, hide the keyboards (2pt)
- “Save” barButtonItem action must hide the keyboards (1pt)
- if the textField has text entered in it, the “Save” action will make a URLRequest to the following URI https://lenczes.edumedia.ca/mad9137/final_api/passport/create/?data=, concatenating the outlet’s values converted to a JSON string on to the end of the URL (15pt)
- write an addRequestTask to process the server data and any errors that are received by the server, and send it to the addCallback function (5pt)
- write an addCallback function that will process any errors if they exist and, if they don’t, tell the navigationController to popToRootViewController (4pt)
Quality Control (49pt)
- use a custom collectionView design instead of using a tableView (9pt)
- add appropriate constraints to all UI objects in the regular viewControllers (10pt)
- application runs without errors (10pt)
- code is well-written and commented thoroughly (20pt)
Total: 200pt
Submission
Submit a .zip file of your assignment through Brightspace.
Use the following naming convention for submissions:
username_assignment-title.zip or for example lenc0001_mid-term.zip
Due by: Dec. 18, 11:59pm
WARNING
NO LATE SUBMISSIONS ACCEPTED!