Midterm Project - Event Scheduler
Objective
For your midterm project, you will create an iOS application that lets users keep a schedule of events and their details.
In this application you will import and reuse the two class files you developed in the first two assignments (Event.swift, and Schedule.swift), and will be building on the knowledge you utilized in Assignment 2.
Overview
For this project, you will be creating an event schedule application that lets users fully manage (create, view and delete) a list of special events.
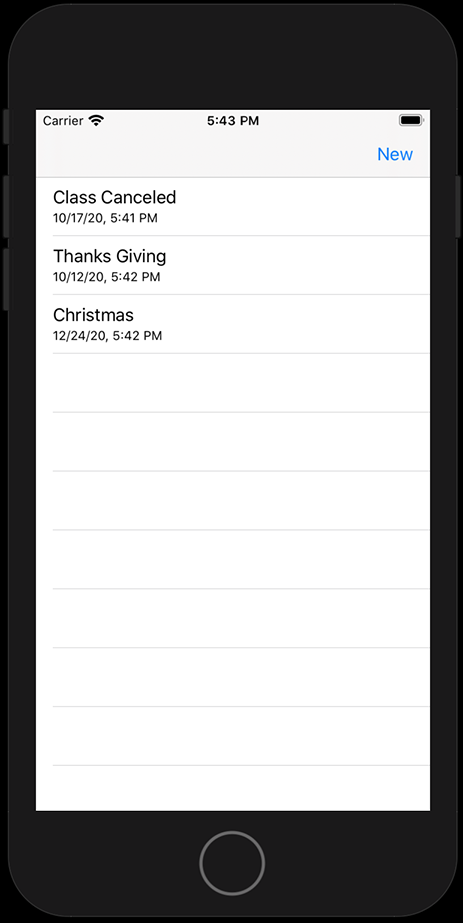
This application will have 3 different views, the first being a TableViewController that will contain TableViewCells that display each events title and date from each Event object added to the schedule. This first view will have a NavigationController embedded in it to manage navigation to other views. This first view will also have a BarButtonItem added to the NavigationController bar in the top-right labeled "New".
When the "New" button is pressed the app will segue to the second view. When a cell containing event info is pressed in the TableViewController the app will segue to the third view.
The second view will be a regular ViewController that has a textField, textView, datePicker and a button labeled "Create New Event" that allows the user to enter information about a new event. Clicking this button will create a new Event object with the title, description and date information, and then passed the object back to the first view to be added to the Schedule’s eventArray. This button should only work if and only if the event title and description contains text.
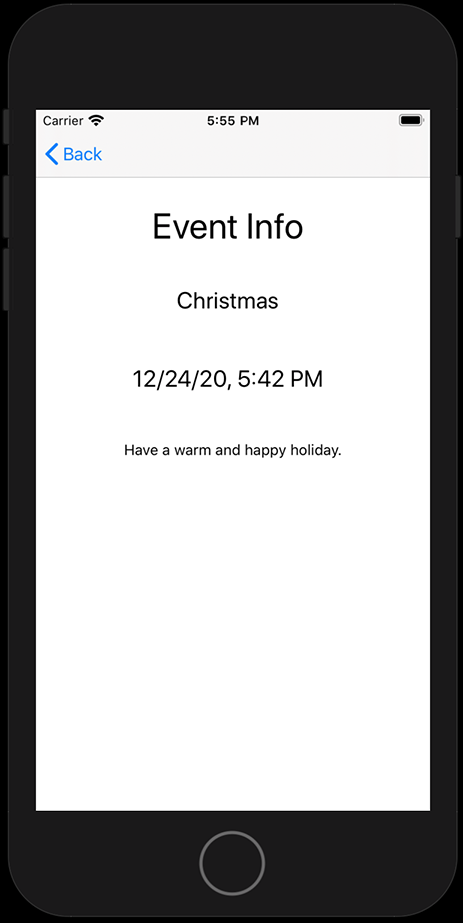
The third view will have 2 labels and a textView to display the title, description and date information for an Event object it receives from the first view. The application will segue to the third view when the user clicks on a TableViewCell from the first view. The first view will pass the correct Event when it prepares to segue to the third view. The third view will have an optional Event variable to hold the object passed from the first view, and will update the labels and textView in the viewDidLoad function.
Your project should have the following layout:
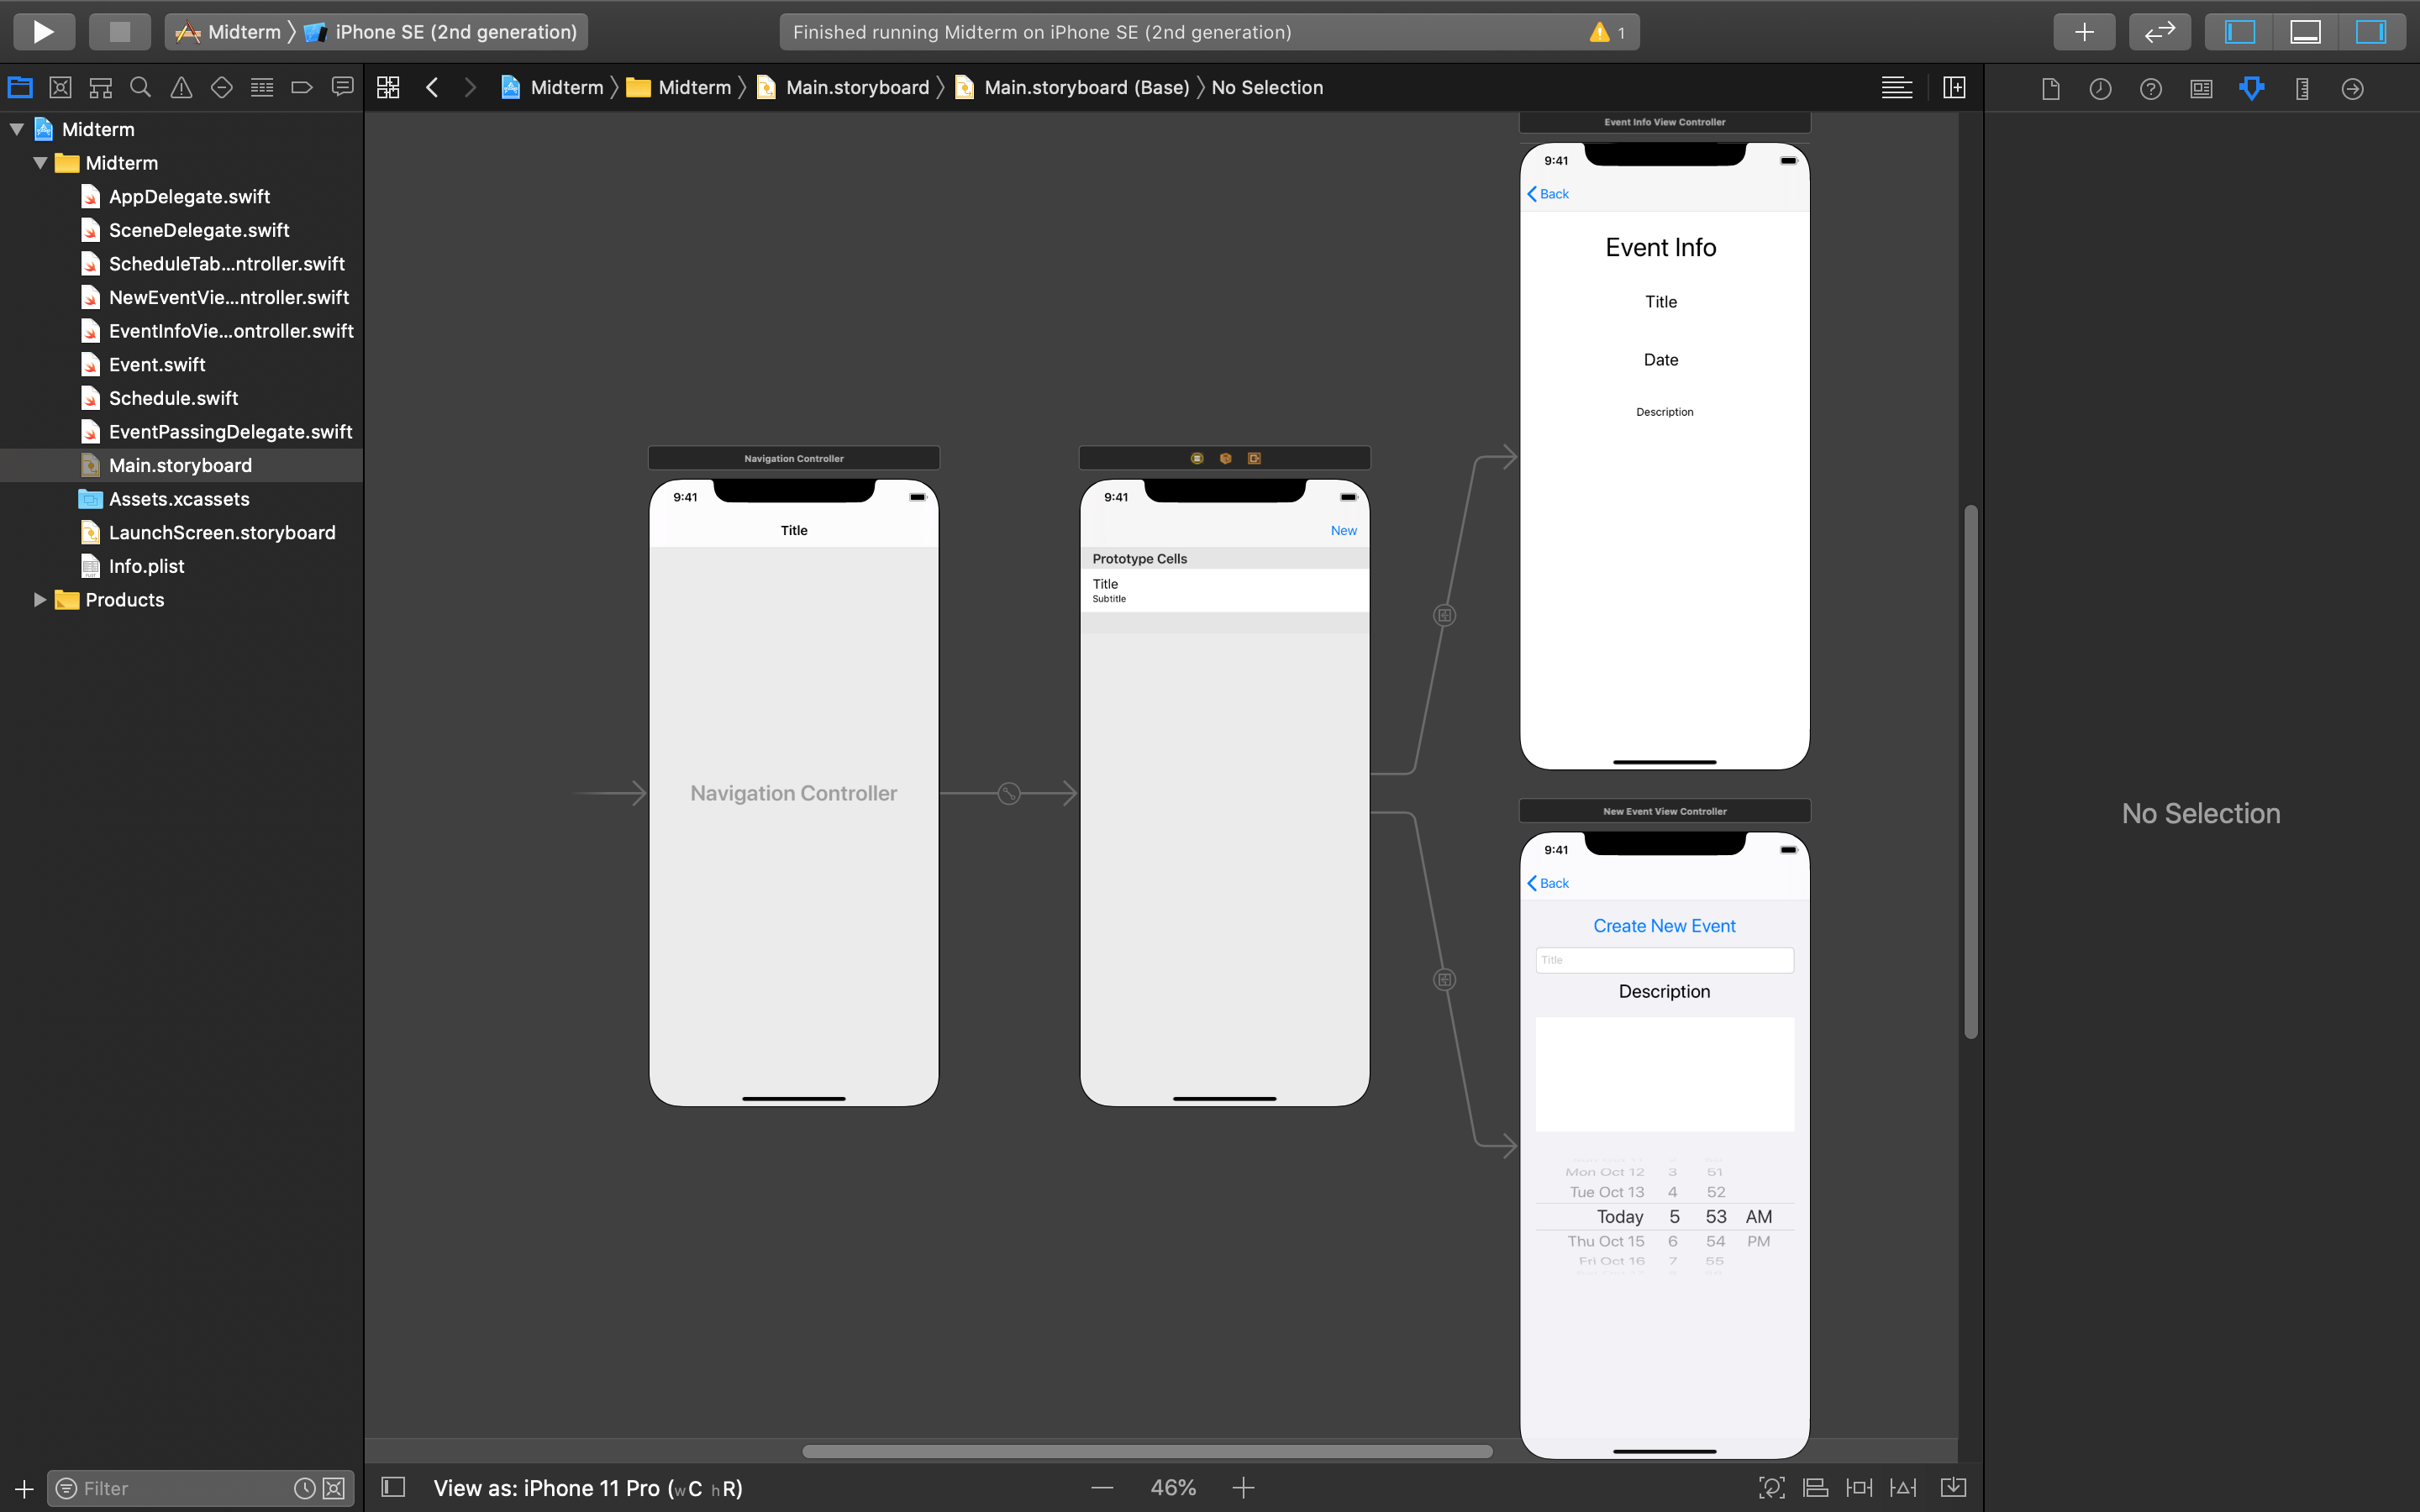
The first view should be called ScheduleTableViewController, the second named NewEventViewController and the third, EventInfoViewController.
Application Details
First View
The initial view will be a TableViewController with a NavigationController embedded in it. The TableViewCells will display the Event titles and dates stored in a Schedule object’s eventArray.
In this view, there will also be a BarButtonItem (a special type of button that can be added to a navigation controller) added to the right hand side of the navigationController atop of the TableViewController labeled “New”.
A segue connecting the first view directly to the second view will be executed in an action when the “New” button is clicked. Clicking on a tableViewCell will trigger a different segue connected to the third view, and will pass the associated Event object to the third view.
This TableViewController must also allow the user to swipe left on a cell to delete that cell. This feature is described further in the Application Logic section below.
Second View
The second view will be a regular ViewController, and will have a textField, a textView, a datePicker and a regular button added to it. The user will be able to enter a title for a new event in the textField, a description of the event in the textView, and select a date for the event with the datePicker.
The button should be labeled “Create New Event” and should be connected to an action. The button's action should only execute its code if the user has entered a title and description for the event.
When some text has been entered in, this button’s action will take the title and description from the textField and textView, and the date object from the datePicker and use these to create a new Event object. Then it will pass the new Event object back to the first TableViewController using delegation so it can be added to the Schedule's array so the tableView can be updated. Finally, at the end of the action you will need to navigate back to the first view by unwinding the segue programmatically.
The navigationController will automatically generate a back button that leads back to the main TableViewController from the second view, canceling the creation of a new event.

Third View
Clicking on a TableViewCell within the table will pass the correct Event object to the third view before segueing to the third view of the application. The third view will be a basic ViewController that will have and optional Event object that will be set from the first view, and will have labels and a textView to display that event’s information.
The navigationController will automatically generate the back button that leads back to the main TableViewController from the third view.
Logic Details
Delegate Protocol
You will also need to creating a new file with an EventPassingDelegate protocol in it that will define a function that will be used to pass the new Event object form the second view back to the first so it can be added to the array and reload the tableView.
Event Class
There are some modifications you will need to make to your Event class. Your Event class will need an additional convenience init method that will take a String fo the title, a String for the description and a Date object for the date. The date variable in the Event class will be directly set by the date parameter passed into this init method. This additional convenience initializer will allow you to initialize a new Event by directly passing the datePicker’s .date value to the Event's new init method.
Schedule Class
Next, there are some modifications you will need to make to your Schedule class. In your Schedule class you will add a second addNewEvent method. The overloaded method will take in just a single parameter of type Event - this will allow you to pass in an Event object and append it directly to the eventArray.
ViewController Classes
All of your viewController classes should be given clear and descriptive names like ScheduleTableViewController, NewEventViewController and EventInfoViewController.
Within the ScheduleTableViewController class, you will create a variable of type Schedule, and initialize the object right away so it is ready to be used.
You will also include some code that gives the user the ability to delete cells, and their associated event array elements from the schedule. This is done by including the the tableView function with commit editingStyle, forRowAt indexPath parameters, and deleting the correct object from the eventArray in your schedule.
The ScheduleTableViewController class will need to inherit from your new EventPassingDelegate protocol, and will set itself to be the delegate of the NewEventViewController class when it prepares to segue to the second view.
The ScheduleTableViewController class will also need to declare the event passing delegate function as defined in your protocol that passes the Event parameter to the Schedule's addNewEvent function. This delegate function must also update the tableView after a new event is added by calling the main tableView’s reloadData() method.
The NewEventViewController will need a variable called delegate that is an optional EventPassingDelegate type. Once an Event object is successfully created in this view, it will be passed back to the delegate's function to be be passed back to the first view before unwinding the segue.
The EventInfoViewController needs an optional Event object that will be set in the prepare(for segue: UIStoryboardSegue, sender: Any?) method from the ScheduleTableViewController. The labels, and textView will be set within the viewDidLoad() method using the information stored in the Event object.
Marks Rubric
STORYBOARD SETUP (33pt)
Setup Storyboard Layout and Needed Class Files (21pt)
- Add Event.swift and Schedule.swift files to the project folder (2pt)
- Create a Protocol.swift class file (1pt)
- Create a new UITableViewController class file called ScheduleTableViewController (1pt)
- Create a ViewController class file called NewEventViewController (1pt)
- Create a ViewController class file called EventInfoViewController (1pt)
- Add a TableViewController with a NavigationController embedded in it as the initial view of the application (2pt)
- Add 2 ViewController objects to your storyboard (2pt)
- Set the TableViewController to use the new ScheduleTableViewController class in your storyboard (1pt)
- Set the first ViewController to use the NewEventViewController class (1pt)
- Set the second ViewController to use the EventInfoViewController class (1pt)
- Add a BarButtonItem in upper right of NavigationController bar within your TableViewController labeled ‘New’ (1pt)
- Add textField, textView, datePicker and button labeled ‘Create New Event’ to second view (4pt)
- Add 2 Labels and TextView to third view to display event information (3pt)
Make Storyboard Connections for Outlets, Actions and Segues (12pt)
First View
- Connect ‘New’ button to an action in the ScheduleTableViewController (1pt)
- Connect a segue called “ShowNewEvent” from the ScheduleTableViewController to the NewEventViewController (2pt)
- Connect a segue called “ShowEventInfo” from the tableViewCell prototype to the EventInfoViewController (2pt)
Second View
- Connect textField, textView and datePicker to outlets in the NewEventViewController (3pt)
- Connect ‘Create’ buttons to an action in the NewEventViewController (1pt)
Third View
- Connect labels and textView to outlets in the EventInfoViewController (3pt)
SWIFT CODING (57pt)
Coding in Protocol, Event, Schedule swift files (10pt)
- Write a protocol that defines a function which takes an Event object as a parameter (2pt)
- In the Event class add a new convenience init method (6pt)
- in the Schedule class add an overloaded addNewEvent function with an Event parameter (2pt)
Coding in EventInfoViewController (5pt)
- Add an uninitialized optional Event property in this class (1pt)
- In the viewDidLoad function, if the optional Event object is set, display its info in the Labels and TextView (4pt)
Coding in NewEventViewController (14pt)
- Add an uninitialized optional delegate property of your protocol type in this class (1pt)
- Inside the button’s action, if the textField and textView’s text properties are not equal to an empty string, then create a new event from the users input. Then pass the Event to the delegate’s function before unwinding the segue (8pt)
- Add dismissing the textView’s, and textField’s keyboard in the button’s action (2pt)
- Add dismissing the textView’s, and textField’s keyboard in the touchesBegan function (3pt)
Coding in ScheduleTableViewController (8pt)
- Make this class inherit from your delegate protocol (1pt)
- Add a Schedule property in this class and initialize it (1pt)
- In the viewDidLoad function add an initial Event to the Schedule with test data (1pt)
- In the “New’ button action perform the segue with the correct identifier to show the NewEventViewController (2pt)
- Write the delegate function to add the Event parameter to the Schedule, and then call the
reloadDatamethod from your tableView (3pt)
Coding tableView functions in ScheduleTableViewController (10pt)
- Override the tableView’s numberOfRowsInSection function (1pt)
- Override the tableView’s cellForRowAt indexPath function (1pt)
- In the numberOfRowsInSection function return the event count from your Schedule object (1pt)
- In the cellForRowAt indexPath function dequeue a tableViewCell using the prototype cell’s identifier, accessing your Schedule’s array at the current indexPath, and displaying the event’s title and date in the cell’s Label before returning it (5pt)
- Use the tableView(_ tableView: UITableView, commit editingStyle: UITableViewCellEditingStyle, forRowAt indexPath: IndexPath){} function to delete the array element corresponding to the current indexPath when a cell is deleted from the table (2pt)
Coding prepareForSegue function in ScheduleTableViewController (10pt)
- Override the viewController’s prepareForSegue function (1pt)
- If the segue is going to the NewEventViewController, get a copy of the next viewController and set its delegate to the tableViewController class (3pt)
- If the segue is going to the EventInfoViewController, get a copy of the next viewController. Safely get a reference to the selected UITableViewCell, and the indexPath for the current cell. If the cell and indexPath references are successfully referenced, set the EventInfoViewController’s Event object to the selected event in your Schedule’s array (6pt)
Quality Control (35pt)**
- Proper Constraints on UI objects (10pt)
- Code is well written with clear commenting (20pt)
- Application runs without errors (5pt)
Total: 125pt
Submission
Submit a .zip file of your assignment through Brightspace.
Use the following naming convention for submissions:
username_assignment-title.zip or for example lenc0001_mid-term.zip
Due by: Nov. 06, 11:59pm